Ad Concepts vs Ad Copy
To better target their ads, most advertisers traditionally only adjust different ads within an ad group. They will often have two or three ads running in tandem in an ad group, and they will simply adjust the wording within the ad copy. This is considered an A/B test of ad copy.
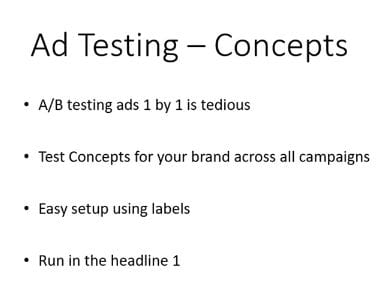
However, I’ve found that a more effective approach is to A/B test ad concepts rather than copy. Rather than testing minor textual changes, we test key concepts about the brand we are advertising, and we run this test across the whole ad account. We also set up a measurement framework to analyse and review results.
A/B testing ads and making incremental changes one by one constitutes an extremely granular approach that can be effective in some cases. However, it is also extremely tedious and time-consuming and is not likely to yield large-scale outcomes.
Testing concepts across your account, on the other hand, is overall more effective, less tedious, and will likely bring in better outcomes for the account as a whole.
The setup is very easy. It is the creative part that is the most challenging, and that is where we need to bring our A game. But once we have overcome that hurdle, implementation is quite simple and straightforward. The best part is that we still heavily rely on the data to tell us what works and what will not. Creativity is important as a point of departure, but after that, the numbers will guide us – and show a more comprehensive picture.
Read on for ad concepts ideas that you can run for your brand.
Part 2: Examples
How do you choose the ad concepts you are going to showcase and how do you know what you should test?
The first and possibly most difficult part is to come up with a set of strong and interesting concepts about your brand and your products. Some ads are going to be very company-specific whilst others can be product-specific. Here are some concept examples we often like to test:
Branded Ads
Some of you reading this might already be working with well-known brands. Branded ads should focus on grasping the essence of the brand and conveying it with a clear message.
Value Ads
‘Affordable’, ‘cheap’, ‘low-cost’ are all examples of a ‘value’ message. ‘Value’ talks about low cost and savings. You could also include pricing in this type of ad.
Quality Ads
‘High quality’, ‘Australian-owned’, ‘manufactured in Australia’, ‘money-back guarantee’, ‘happiness assured’ – these are all concepts you can use to signal the quality of the brand.
Product-Specific ads
Product-specific ads talk about the inherent qualities of the product. Specific keywords targeted to product specific ad copy, driving searchers to a product page is a great way to increase Quality Score (QS). It’s, therefore, an important concept to test in terms of engagement, ROI and QS values.
Testimonials
Not many marketers use testimonials in ads. We have used them in the past and found that they work well – primarily because they stand out. For example: “Fred from Sydney says, Fantastic service!”. That kind of headline will create appealing trust factors to someone reading your ad.
Question vs. Statement
An interesting experiment we like to run is to split test headlines with a question vs. a statement. Here’s an example we could use for an auto-electrician: “Need auto repair today?” is a question version, and then the non-question, statement version would be “Auto repair shop in Sydney”. Run them against each other and measure whether people respond better to questions or to statements.
Above All, Test Everything…
The most important part of all this is testing. Test a ‘brand’ message on a product specific keyword. Test a ‘product specific’ ad on a brand keyword. Test a ‘quality message’ on branded keywords, etc. The point is to test concepts across all your keywords. Your audience might respond best to brand ads or perhaps value ads will draw more eyeballs. You will never know unless you give different options airtime and measure the results.
Label Your Tests Correctly
To correctly measure the results, you must label your ads appropriately. Tagging ads with appropriate labels will allow us to quickly identify strong performers at a glance.
I often come across accounts with dynamic keyword insertion (DKI) used within ads. Yet these DKI ads are not labelled as such. If advertisers are running DKI and static ads, how do they know which ones are performing better? It is possible to see results within one AdGroup, but to review holistically across an account, correct labelling is essential. Otherwise there is an enormous missed opportunity to review ad concept performance within an account.
Part 3: Setting up labels
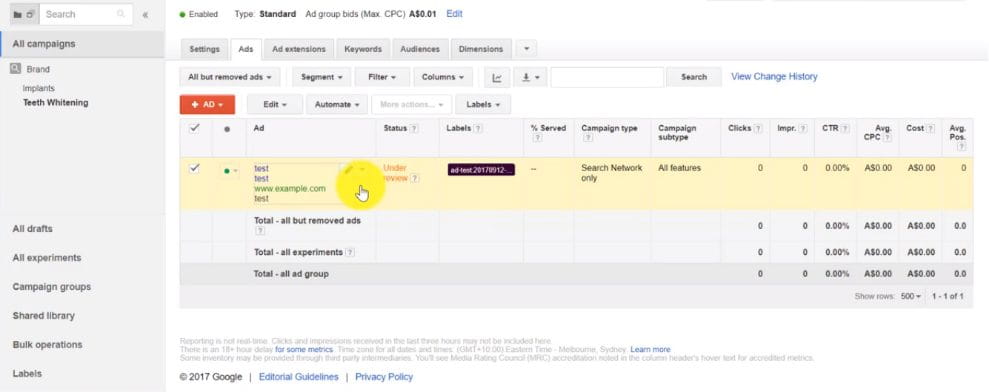 Setting up a correct label structure is essential for keeping track of your ads’ performance. This step is crucial to reporting results.
Label the existing Ads first
The best way to set this up initially is to select all the existing ads that are currently running and group them under a label.
For example, you could group them under the label ‘Ad-test’. Date the label to the current date, so that you have a record of when you started comparing them to the new ad concepts. You should also append “Legacy” onto this label. This will look like: Ad test: {date} – Legacy.
Label the new ad test consistently

Now that we’ve labelled all the existing ads, we can now begin creating new concepts. Let us start with branded ads. Create them and label them all Ad test: {date} – Brand.
Then for a ‘value’ add. The label will be: Ad test: {date} – Value.
It’s important to label the legacy ads in the beginning so we can quickly compare all legacy ads versus all the new ads. This allows us to see whether spending time implementing this strategy was at all fruitful.
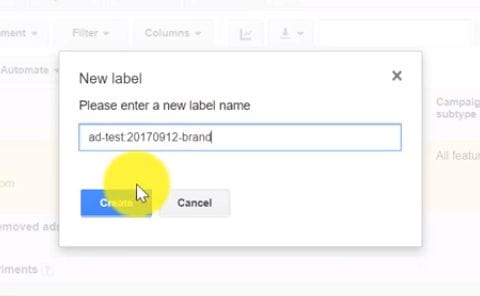 How do you add these custom labels?
Navigate to the ad tab. Select the ad that you’re going to add these labels to (you can select multiple ads). Then choose Labels >> Create new >> type in your new label: Ad test 20180212 – Brand. >> click ‘Create’ and you’re done!
This can be done in the AdWords Editor as well, much quicker. Once you’ve created one ad in one adgroup and labelled it, you can copy/paste it across to the relevant ad groups. The label will follow with the copied ads wherever you move them to.
It’s important to note that if you copy these ads to new AdGroups, you should check if you need to update the text in other AdGroups and also update the landing pages accordingly. Now you have a set of ads across your account that are testing a Branded ad copy concept, and you’ll have them across all your different campaigns. With these labels neatly in place, you’ll be ready to start reporting on them.
Part 4: Reports
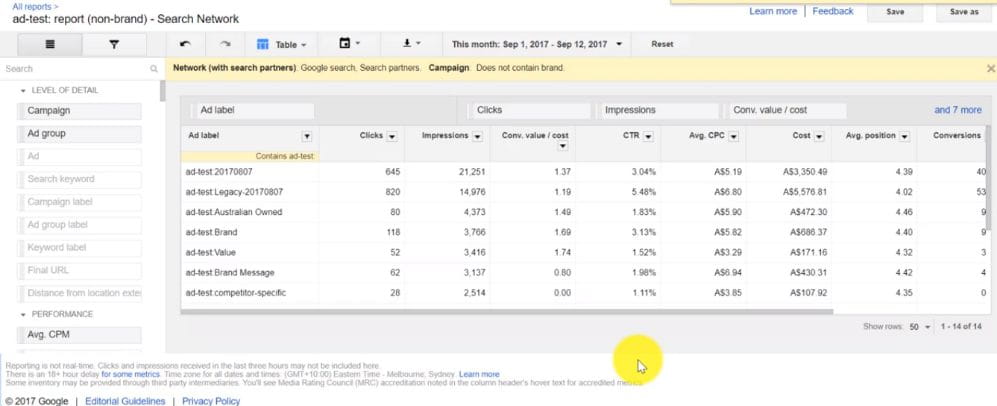
This is where the fun begins. In the report section, we’re going to be able to review how these concepts are running. The great thing about this report is that it is within AdWords, which means it’s dynamically updated. As the ads are running and as your labels are capturing all the different concepts, you can review them in real time, and there’s no need to export and pivot the data; all the magic happens right here.
Set Up Your Report
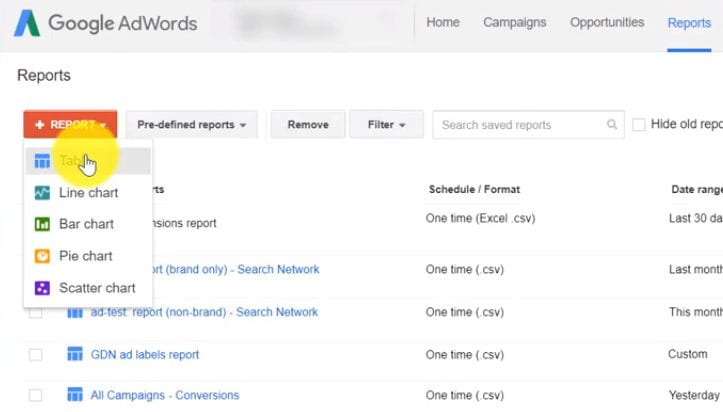
In AdWords, navigate to Reports >> click on Reports >> create a new report. Then grab the labels on your ads and move them into the report. Now you have the head label, which is what you will want. You might have a bunch of other labels in your account that you’re not really interested in, you can filter the labels using the button above the report table.
For example, you can filter for Ad Label Contains ‘Ad test’, since we’ve setup our labels to contain ‘ad-test’ so we can find them quickly here. Then apply the filter – and now you should see in the report all the concepts we have setup previously as row items.
Add in Metrics
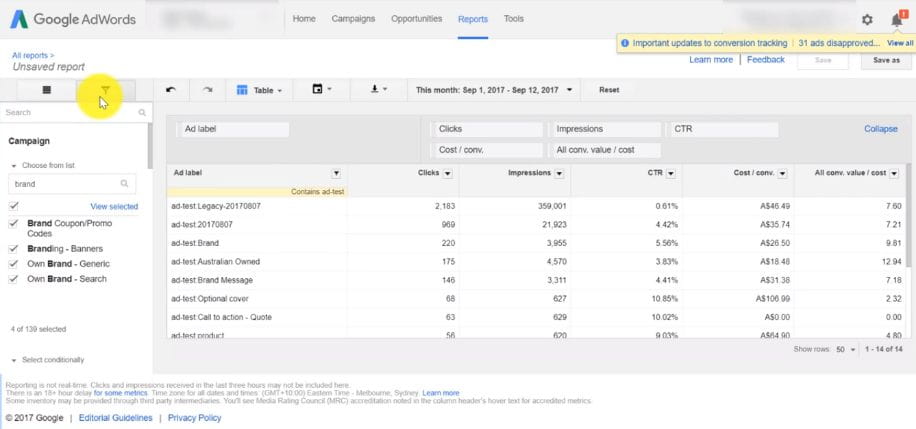
Next, you’re going to add in all your metrics. You need to decide exactly what you want to see. But let’s assume that ‘clicks’, ‘impressions’, ‘CTR’, ‘conversion value over cost’ and ‘cost per conversion’ are key metrics.
Following this we can make a filter to display only branded ads. First make sure you’ve set your campaigns up so that if it’s a branded campaign with branded keywords, it has the word ‘brand’ in the campaign title. Now you can set a filter so that your report contains only campaigns with the term ‘Brand’. And don’t forget to save it.
Now you can differentiate your legacy ads and see how they are performing. If we sort by ‘CTR’ we can quickly see which campaigns are performing the best. We can set a date range to make the picture clearer.
If I want to see performance only for non-branded ads, I would create a separate report filtered for just campaigns without ‘Brand’ in the campaign name and save that report separately.
Sorting by different metrics such as by ‘conversion value of a cost’ (ROI) gives quick insight into top performing concepts.
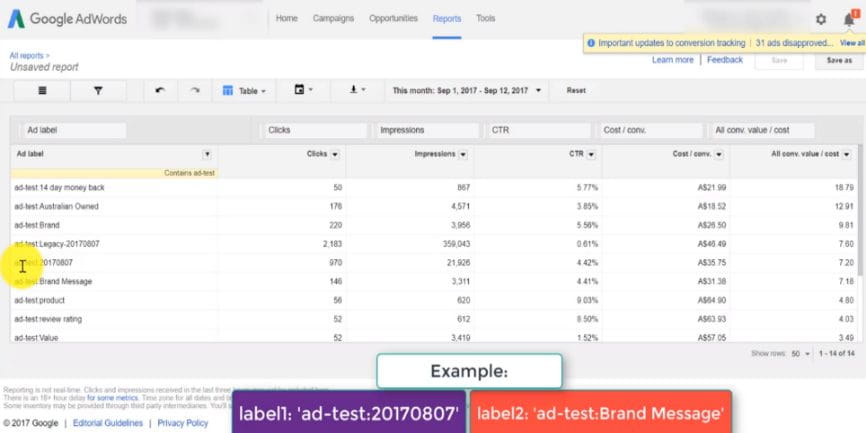
In examples I’ve run, there are certain concepts which can be extremely strong. ’14-day money back’, is a great ‘value’ type ad. ‘Australian-owned’, is often very appealing as well for local purchasers.
At this stage you should make note of the highest performing concepts. Then you can go back and start building out more ads based what type of concept your customer base finds the most appeal.


